On Windows 10, a clean installation is a process in which you erase the hard drive to start from scratch with a new setup when your computer is having problems. For example, using this method can help resolve performance, memory, startup, shut down, and app issues. In addition, it can even help to improve battery life on laptops and tablets, and it's a practical approach to eliminate viruses and other malware.
If you've been using the same setup for some time, a clean installation is a good option to upgrade to the most up-to-date version of Windows 10 or upgrade from an older version, such as Windows 8.1 and Windows 7, minimizing the risks of issues during and after the process.
It's also the option you should use to start fresh with a copy of Windows 10 on a new device that came preloaded with bloatware, a device you're readying to giveaway, or during a hard drive replacement.
In this Windows 10 guide, we'll walk you through the entire process to perform a clean installation, whether you're upgrading to the Windows 10 May 2020 Update, or making the leap to Windows 8.1 or Windows 7.
How to prepare device for clean install of Windows 10
How to create USB bootable media to clean install of Windows 10
How to perform clean install of Windows 10
How to complete setup after clean install of Windows 10
How to prepare for clean install of Windows 10
If you're planning to perform a clean installation of Windows 10, it's usually recommended to complete some tasks before proceeding to reduce the chances of problems and avoid data loss.
In the case that you already have a backup of your data, you have an activation key, the device is configured to boot from USB, and you disconnected non-essential peripherals, then you can skip these instructions and jump to bootable media creation and a clean install process.
Create backup
The clean installation process erases everything on the main drive, as such before proceeding is advised to create a full backup of your device, or at least a backup of your files.
Backup entire device
Although you'll start from scratch with a fresh copy of Windows 10, you should create a temporary full backup of your current installation, in case something goes wrong, and you need to revert the settings, or recover files.
You can choose from a number of solutions, but the easiest way to create a full backup is to use the legacy System Image Backup tool available on Windows 10 as well as on Windows 8.1 and Windows 7.
Backup files to OneDrive
The easiest way to create a backup of your documents, pictures, and other files is to upload the data to the OneDrive folder or cloud storage service of your choice.
If you're using OneDrive, you can also use the backup settings to synchronize your profile folders, including Documents, Pictures, and Desktop.
To configure the OneDrive backup settings on Windows 10, use these steps:
Open Settings.
Click on Update & Security.
Click on Backup.
Under the "Back up files to OneDrive" section, click the Back up files option.
Quick tip: This option is available starting version 2004. If you're not using the latest version of Windows 10, you can still access these backup settings from the OneDrive settings page using the icon in the taskbar.
(Optional) Click to clear the folder that you don't want to backup in the cloud.
Click the Start backup button.
Once you complete the steps, OneDrive will begin backing up the files on the Desktop, Documents, and Pictures user folders in the cloud while keeping a copy on your computer and syncing them across your devices.
Backup files to external drive
If you have a lot of files, perhaps the best option would be making a copy of the files to an external hard drive.
To create a file backup manually, connect an external drive with enough storage, and then use these steps:
Open File Explorer.
Type the following path in the address bar and press Enter:
%HOMEPATH%
Click the Select All button from the "Home" tab.
Click the Copy to button from the "Home" tab.
Select the Choose location option.
Select the destination location.
Click the Copy to button from the "Home" tab.
Select the Choose location option.
Select the destination location.Download essential drivers
Windows 10 is capable of detecting and installing most device drivers automatically. However, it's a good idea to download at least the essential drivers ahead of time, such as for the network adapter and graphics card, in case the setup fails to add these drivers correctly, especially on custom PC builds.
You can use our guide to install device drivers on Windows 10.
Below, you'll find a list of websites from the most popular computer manufacturers to download the latest device drivers.
DellHPLenovoASUSAcerSamsungMSI
Check Windows 10 activation
After a copy of Windows 10 has been properly activated, you don't need to resupply the product key. Once the new installation completes, the system will automatically activate as soon as it connects to the internet.
To confirm if Windows 10 is properly activated, use these steps:
Open Settings.
Click on Update & Security.
Click on Activation.
Under the "Windows" section, confirm that your computer is activated.
After you complete the steps, if your current setup is activated, Windows 10 should automatically reactivate after the installation.
Obtain Windows 10 product key
If you'll be installing Windows 10 on a new device, or you're trying to upgrade Windows 8.1 or Windows 7, you'll need to purchase a valid license from the Microsoft Store, Amazon, or another retailer.
Confirm Windows 10 requirements
When the device is already running Windows 10, then the upgrade is likely to meet the minimum hardware requirements. However, if you're about to upgrade an older computer running Windows 7 or Windows 8.1, you want to make sure that the device meets the minimum requirements.
These are the minimum requirements to install the Windows 10 May 2020 Update and later releases:
Processor: 1GHz or System on a Chip (SoC)
Memory: 1GB for 32-bit or 2GB for 64-bit
Storage: 32GB for 64-bit or 32-bit
Graphics card: DirectX 9 or later with WDDM 1.0 driver
Display: 800x600
You can use these instructions to learn the steps to check your device technical specifications to make sure that you can install Windows 10.
Change boot order on firmware
When you choose to perform a clean installation, you must start the computer with a USB bootable media containing the installation files. However, this is only possible if the Basic Input/Output System (BIOS) or Unified Extensible Firmware Interface (UEFI) on the motherboard is configured to boot from USB.
Configure boot order using UEFI
If the device in question has UEFI firmware, you can access the settings to change the boot order from within the desktop environment, whether you're using Windows 10 or Windows 8.1.
UEFI settings on Windows 10
To change the UEFI boot settings on Windows 10, use these steps:
Open Settings.
Click on Update & Security.
Click on Recovery.
Under the "Advanced Startup" section, click the Restart now button.
Click the Troubleshoot button.
Click on Advanced options.
Click the UEFI Firmware Settings option.
Click the Restart button.
While inside the firmware environment, open the Boot settings.
Set the boot order to start from the USB media with the Windows 10 installation files.
Save the changes.
After you complete the steps, the device should be able to start from a USB flash drive.
UEFI settings on Windows 8.1
To change the UEFI boot settings on Windows 8.1, use these steps:
Open Settings.
Click on Update and recovery.
Click on Recovery.
Under the "Advanced Startup" section, click the Restart now button.
Click the Troubleshoot option.
Click the UEFI Firmware Settings option.
Click the Restart button.
While inside the firmware, open the Boot settings.
Set the boot order to start from the USB media with the Windows 10 installation files.
Save the changes.
Once you complete the steps, the device should start from a USB flash drive to proceed with a clean installation of Windows 10.
UEFI settings on Windows 7
To change the UEFI boot settings on Windows 7, use these steps:
Start device.
Press the F1, F2, F3, F10, or F12, the ESC, or Delete key to access the firmware.
Quick tip: The steps to access the BIOS varies per manufacturer and even per computer model. As a result, you may need to check your manufacturer support website for more specific steps.
While inside the firmware, open the Boot settings.
Set the boot order to start from the USB media with the Windows 10 installation files.
After you complete the steps, you should be able to start the computer using a bootable media to install Windows 10.
Configure boot order using BIOS
If the computer uses the legacy BIOS firmware, you can change the boot order using these steps:
Start device.
As soon as the computer starts booting up, press one of the function keys (F1, F2, F3, F10, or F12), the ESC, or Delete key.
While inside the BIOS, find the Boot settings.
Set the boot order to start from the USB media with the Windows 10 installation files.
Save the changes.
Once you complete the steps, your computer should be able to start from the USB bootable media.
Disconnect non-essential peripherals
Peripherals connected to your device are usually the reason for issues during the installation process. If you have non-essential peripherals connected, such as removable storage and other USB and Bluetooth devices as well as printers, scanners, cameras, and others, it's recommended to remove them.
When performing a clean install of Windows 10, you only need a monitor, keyboard, mouse, and an internet connection. After the process, you can reconnect the peripherals again (one at a time), making sure they don't cause other issues.
How to create USB for clean install of Windows 10
On Windows 10, to perform a clean installation, you'll need a USB bootable media, which you can easily create using a number of tools, including the Microsoft Media Creation tool or third-party utilities, such as Rufus.
Create Windows 10 USB with Media Creation Tool
To create an installation media using the Media Creation Tool, connect a USB flash drive of at least 8GB of space, and then use these steps:
Open Windows 10 download page.
Under the "Create Windows 10 installation media" section, click the Download tool now button to save the file.
Double-click the MediaCreationToolxxxx.exe file to launch the tool.
Click the Accept button to agree to the Microsoft terms.
Select the Create installation media (USB flash drive, DVD, or ISO file) for another PC option.
Click the Next button.
(Optional) Clear the Use the recommended options for this PC option.
Select the correct language, architecture, and edition of Windows 10 (if applicable).
Quick tip: If you plan to install Windows 10 on several devices running the 32-bit or 64-bit architecture, use the "Architecture" drop-down menu and select the Both option.
Click the Next button.
Select the USB flash drive option.
Click the Next button
Select the USB flash drive (or click the "Refresh drive list" to make it available).
Click the Next button.
Click the Finish button.
Once you complete the steps, the Media Creation Tool will download the files and create an installer, which you can then use to start your device and set up a fresh copy of Windows 10.
Create Windows 10 USB with Rufus
In the case that the Media Creation Tool isn't working, you can alternatively use the Rufus tool to create the installer for devices with UEFI or BIOS firmware, even if you don't have a Windows 10 ISO file.
Important: Rufus is a popular tool with many options to help you create a bootable media of Windows 10 faster. However, it's still a third-party tool, which is not supported by Microsoft. Use it at your own risk.
To create a Windows 10 installer with Rufus, connect a USB flash drive of at least 8GB of space, and then use these steps:
Open Rufus download page.
Under the "Download" section, click the latest release of the tool to save the file on your device.
Double-click the Rufus-x.xx.exe file to launch the tool.
Click the Yes button if you want the app to check updates.
Under the "Device" section, select the USB flash drive with at least 8GB of space.
Under the "Boot selection" section, click the down arrow button next to the "Select" option on the right and click the Download button.
Quick tip: If you already have an ISO file, click the Select button, select the Windows 10 ISO file, and continue with step No. 20. If the option to download the ISO isn't available, click the Select button, and then the Cancel button to reveal the option.
Click the Download button.
Use the "Version" drop-down menu and select the Windows 10 option.
Click the Continue button.
Select the 20H1 (Build 19041.xxx - xxxx.xx) option to download the Windows 10 May 2020 Update.
Click the Continue button.
Use the "Edition" drop-down menu and select the Windows 10 Home/Pro option.
Click the Continue button.
Use the "Language" drop-down menu and select your installation language.
Quick tip: If you're in the United States, select the "English" option, not "English International."
Click the Continue button.
Use the "Architecture" drop-down menu and select the 32-bit or 64-bit (recommended).
Click the Download button.
Select a folder location to download the ISO file.
Click the Save button.
Use the "Image option" drop-down menu to select the Standard Windows installation option.
Use the "Partition scheme" drop-down menu to select the GPT option.
Use the "Target system" drop-down menu to select the UEFI (non CSM) option.
Quick note: If the computer includes a legacy BIOS, select the MBR option for partition scheme and BIOS (or UEFI-CSM) option target system.
Under the "Show Advanced drive properties" section, leave the default settings.
Under the "Volume label" field, enter a descriptive name for the drive — for example, "win10_usb."
Under the "File system" and "Cluster size" section, leave the default settings.
Click the Show advanced format options button.
Select the "Quick format" and "Create extended label and icon files" options.
Click the Start button.
Click the OK button to confirm.
Click the Close button.
After you complete the steps, Rufus will download the ISO file from the Microsoft servers, and it'll create the bootable media to perform a clean install of Windows 10.
How to perform clean install of Windows 10
The Windows 10 installation process has two parts, including setup and out-of-box experience (OOBE). In the setup process, you'll select some basic settings, and you'll have the option to erase the hard drive, configure partitions, and perform a clean installation of Windows 10. During the out-of-box experience, you'll configure personal settings, such as language, network, account, privacy, and more.
Windows 10 clean install process
After the preparation, the clean install process of Windows 10 is a straightforward process.
Warning: This is a friendly reminder that this process will erase everything on your computer. It's always recommended to make a temporary full backup of your PC before proceeding.
To do a
Start the device with Windows 10 USB media.
On prompt, press any key to boot from the device.
On the "Windows Setup," click the Next button.
Quick tip: Usually, it's unnecessary, but if your language, time and currency, and keyboard are different from the default selections, make sure to select the correct settings before continue.
Click the Install now button.Type the product key if this is your first time installing Windows 10. If you're reinstalling the OS, click the I don't have a product key option to continue (assuming that your device was already activated).
clean installation of Windows 10, use these steps:
Click the Next button.
Select the edition of Windows 10 (If applicable). This selection must match the edition your product key activates.
Click the Next button.
Select the I accept the license terms option to continue.
Click the Next button.
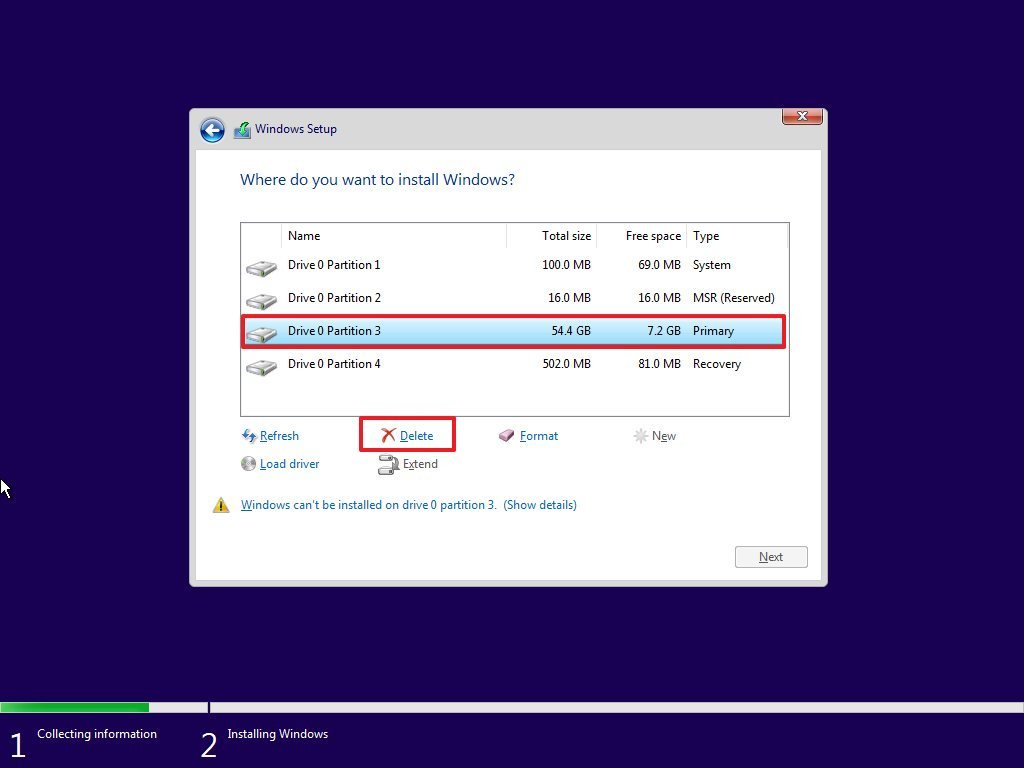
Click on the Custom: Install Windows only (Advanced) option to continue with a clean installation.
Select the partition with the current installation (usually "Drive 0"), and click the Delete button.
Quick tip: If "Drive 0" has multiple partitions, you have to select and delete each of the partitions to allow the setup to use the entire drive for the new clean installation. Windows 10 will create the required partitions automatically during the process. It's not necessary to delete the partitions on secondary drives.
Click the Yes button.
Select the empty drive (Drive 0 Unallocated Space).
Click the Next button.
Once you complete the steps, the setup will install Windows 10 on the computer.
If you're planning to decommission the device, you can stop now and let the new owner complete the out-of-box experience. If you're upgrading a system you're planning to use, continue with the instructions below.
Windows 10 out-of-box experience
After the setup, you need to continue with the out-of-box experience to create a new account and configure your preferences.
This guide follows the out-of-box experience available with Windows 10 version 2004 (May 2020 Update), but depending on the release you are trying to install; the steps may be slightly different.
To complete the OOBE on a new install of Windows 10, use these steps:
Select your Region option.
Click the Yes button.
Select your keyboard layout option.
Click the Yes button.
Click the Skip button (unless you need to add a second keyboard layout)
Quick note: If you're not using a wired network connection, you'll need to sign in to the wireless network, and then proceed with the account settings.
Click the Set up for personal use option.
Click the Next button.
Type your Microsoft account information to create an account.
Quick note: The recommended process is to use a Microsoft account. However, if you want to use a traditional local account, you'll need to click the Offline account option from the bottom-left corner, and then continue with the on-screen directions.
Click the Next button.
Type your Microsoft account password. Or if you use your phone to sign in to Microsoft services, you can click the Use the Microsoft Authenticator app instead option (if available).
Click the Next button.
Click the Create PIN button
Create your new four-digit Windows Hello PIN.
Quick tip: If you want to continue using a traditional password, click the Cancel button to skip the process.
Select your privacy settings (and don't forget to scroll down the page to review all the settings).
Click the Accept button.
(Optional) If you wish to enable Timeline to access your activity history across devices, click the Yes button. Otherwise, click the No button.
Quick tip: If you have an Office product key, you can click the I have a product key option, and then the apps will install automatically on your device.
(Optional) Check the Let Cortana respond to "Hey Cortana" option to use the assistance hands-free.
Click the Accept button to allow Microsoft to collect personal information to make Cortana more personal. If you're not interested in the digital assistant, click the Not now button to continue.
After you complete the steps, the settings you selected will apply to the clean installation, and you should be able to see the default desktop experience.
How to complete setup after install of Windows 10
Although it's not a requirement, after the installation, you want to make sure that Windows 10 isn't missing any important updates, is properly activated, and there are no issues with device drivers.
Install updates
To install the latest cumulative updates on Windows 10, use these steps:
Open Settings.
Click on Update & Security.
Click on Windows Update.
Click the Check for updates button.
Once you complete the steps, if Windows Update finds any updates, it'll automatically download and install them. A restart may be required to complete the update process.
Confirm activation
To confirm Windows 10 is activated, use these steps:
Open Settings.
Click on Update & Security.
Click on Activation.
If Windows 10 activated successfully, one of the following messages would appear:
Windows is activated with a digital license: The installation has been activated, but it isn't linked to your Microsoft account.
Windows is activated with a digital license linked to your Microsoft account: The installation has been activated, and the license is linked to your Microsoft account.
In the case that Windows 10 didn't activate, usually, the device will reactivate within a day or two. If you're still having issues, you can use the Activation Troubleshooter to activate.
Check missing drivers
To determine whether Windows 10 isn't missing any drivers, use these steps:
Open Start.
Search for Device Manager and click the top result to open the console.
Confirm that none of the devices have a yellow or red mark, and make sure nothing is listed as unknown.
If one or multiple devices have problems, you'll need to manually download and install the latest drivers from your computer manufacturer's support website.
You can use this guide to install device drivers on Windows 10.
Reinstall apps
It's now time to reinstall your applications, including web browser, such as Microsoft Edge, Google Chrome, Mozilla Firefox, or Opera to browse the web.
If you use Spotify or iTunes to listen to tunes while working, you can download these apps and other from Microsoft Store.
Also, it's now a good time to download and install the suite of Office apps to start working with Word, Excel, PowerPoint and managing your emails with Outlook.
Restoring files from backup
Finally, if you backed up your files using OneDrive, then the data should already be available inside the OneDrive folder, however, if the client didn't configure automatically, you can use this guide.
In the case that you have a backup of your files, reconnect the external drive to restore the data to your account folders.
To restore files from a previous backup, use these steps:
Open File Explorer.
Under the This PC section in the left pane, select the external drive with the backup.
Select the folders with the file that you want to restore.
Click the Copy to menu from the "Home" tab.
Select the Choose location option.
Select the destination to restore the files — for example, in the Documents folder.
(Optional) Click the Make New Folder button.
Specify a name for the folder (such as Backup) and press Enter.
Select the newly created folder.
Click the Copy button.
After you complete the steps, the files will restore to your device.
Although you can start a clean installation using the Media Creation Tool without a USB media and even the Reset this PC option from the recovery settings, using these methods have their limitations, and they no always work as expected.
If you want to make sure that you're performing a true clean installation, using the bootable media is a better alternative.
-Tom Joe James
:max_bytes(150000):strip_icc():format(webp)/chromiumcloudreadychromeos-5b81fb8446e0fb0025dcc00f.jpg)
:max_bytes(150000):strip_icc():format(webp)/downloadchromeoscloudreadyinstaller-5b81df17c9e77c00505eaa24.gif)
:max_bytes(150000):strip_icc():format(webp)/createchromeoscloudreadyusb-5b81dcfd46e0fb0082f1b7a8.gif)
:max_bytes(150000):strip_icc():format(webp)/installchromeosmacchromebook-5b81e6cbc9e77c00509f6137.gif)
:max_bytes(150000):strip_icc():format(webp)/chromeosinstallermacchromebook-5b81e6a046e0fb0082f358f1.gif)
:max_bytes(150000):strip_icc():format(webp)/chromeoscloudreadybootfromusb-5b81f62ec9e77c002514612e.gif)
:max_bytes(150000):strip_icc():format(webp)/installchromeoscloudready-5b81f65046e0fb0050f63b13.gif)

